Managing contacts
The Contacts feature lets you manage your clinic's contact list in one place. You can add new contacts manually or in bulk, organize them with tags, update their details, and review their past activities or interactions with your DentalFlo account.
This guide covers how to:
- Create, upload, and manage new contacts
- Use contact tags to organize and filter contacts
- Edit contact details
- View a contact's activity history
- Understand contacts created automatically by AI agents
Create new contacts
DentalFlo provides three ways to add contacts:
- Automatically — contacts created when patients call or text your clinic
- Manually — add contacts one at a time
- Bulk upload — import multiple contacts from a CSV file
Automatically created contacts
Whenever a new patient calls or sends an SMS to your clinic and their phone number isn't in your existing contacts list, DentalFlo automatically creates a new contact record.
These contacts will include:
- The patient's phone number as the primary identifier.
- A log of the conversation (call or SMS) under their activity history.
- The option for you or your staff to later update their profile with name, email, and other details.
This ensures your clinic never loses track of first-time patient inquiries or new leads, even if you haven't added them manually.
Manually add a new contact
- On the sidebar menu, go to Communications > Contacts.
- At the top-right corner, click Add Contact.
- In the Create New Contact window, enter:
- First Name and Last Name
- Phone Number
- Click Create Contact.
If the phone number already exists in your contacts, the system will prompt you to update the existing record instead of creating a duplicate.
Upload contacts in bulk
Before uploading, prepare a CSV file with the following required columns:
- First Name
- Last Name
- Phone Number
- Email Address (optional)
You may also include custom fields (e.g., lead source, referral notes) to capture additional details.
To upload contacts:
- On the sidebar menu, go to Communications > Contacts.
- At the top-right corner, click Add Contact.
- In the Create New Contact window, click the Upload area and select your CSV file.
- Click Create Contact.
- In the Map CSV Columns window, match your file's columns to the required fields (
first_name,last_name,number).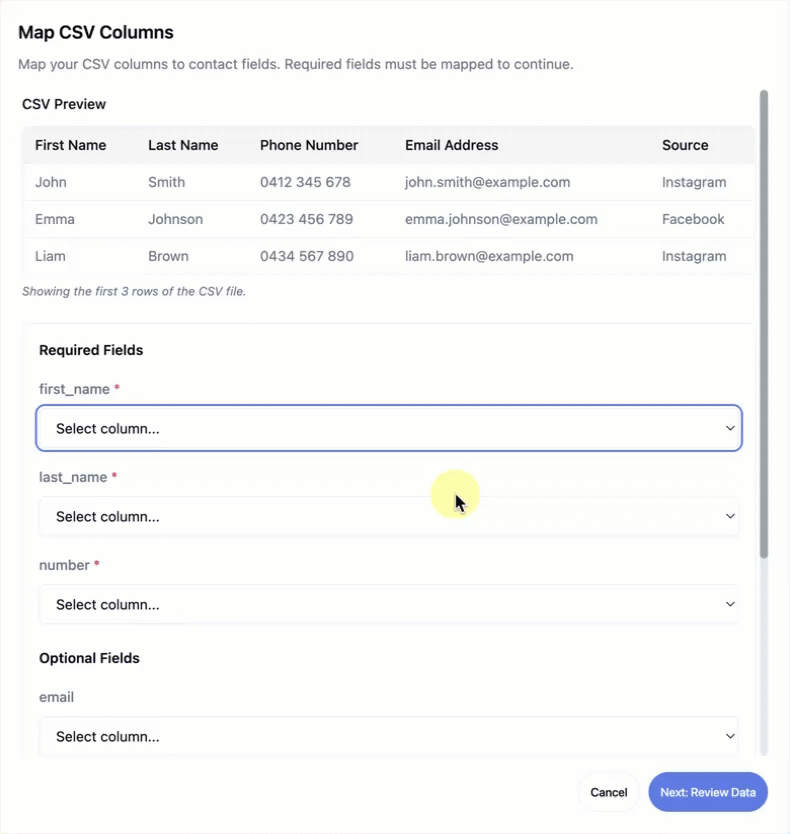
- If your file includes custom fields, create them in DentalFlo under Custom Fields, then map them to the matching columns in your CSV.

- Click Next: Review Data.
- In the Review window, check the status of each contact and make sure to resolve all the flagged records.
- Ready to Import → Valid contacts that will be added.
- Needs Attention → Possible duplicates or errors.
- Will Update → Existing contacts with matching phone numbers that will be updated.
- Incomplete → Missing required fields.
- (Optional) Apply tags to all imported contacts: click Add Tags to All, select the tags, and click Apply Tags to All.
- Click Import Contacts. The contacts are now added to your account.